We eat loads of yogurt at our house. All of us. Ron and I, the pups, the kitties. Loki the St. Bernard, has IBS, - yes, amazing isn't it? - and the only thing that really works is 3 heaping Tablespoons of yogurt with each of his 4 meals. The good thing is though, it really does work. Healthwise it is good for all of us and we love it. But have you looked at the store? Even the large economy containers are expensive if you are eating 1 - 2 gallons of yogurt a week. Which we do! With my recipe you make about 1 gallon of yogurt for the price of 1 gallon of milk - 1/4 at least, of the store bought cost.
So today I will share with you how I make both yogurt and Greek Yogurt. And in the next week, I will add, cheese, bread and soup. Why? Because they are all related in their ingredients, taking from one another. I love Food Science, and hope you will enjoy it too!
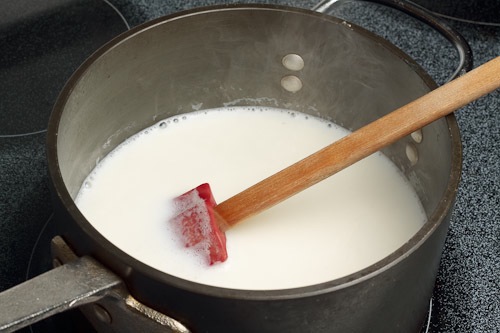
We don't use Yogurt Makers here. The ones I have seen, we would have to use them 3 times a day to get the quantity of yogurt we eat. I use a large pan that easily holds a gallon of milk. This is very important. Because if you use less milk with this method, it cools too quickly and doesn't actually make yogurt. And the milk, you can use Whole or 2%. Less than that does not give you as much yogurt and it is too watery.
Put your stove setting on high, we want to ALMOST boil the milk. This process is very meditative for me, enjoy it. While the milk is heating to 175 to 180 degrees, stir absolutely constantly. Watch the change in the milk's consistancy and color. In a short period of time of making yogurt regularly, you will be able to see the milk change and practically tell when it is ready by sight. In my pan, which is coated metal, it takes 15 minutes to get the milk to 175 degrees.
Now turn your stove off and let set until it is between 110 and 120 degrees. Again, mine take about 50 minutes, in a metal coated pan. Now the 1st time you make yogurt you need to buy regular, NEVER FLAVORED, yogurt. The luncheon size, what is it 6 - 8 oz? The first time, I use a lot of starter to insure thick creamy yogurt. After the initial batch, I use about 1/4 of a cup or if you want to use "freeze dried starter" from the health food store, 4 packets. (The starter in packets is really nice to have around for emergercy. You know, like you ate all the yogurt and forgot to keep some for starter.) Put the entire contents in the warm milk and stir well. Put your lid on and move the yogurt to a place where you will not disturb it. You will be putting the yogurt "to bed" now. We use a flannel sheet and cover the entire pan, with lid on. A wool blanket or winter coat will also work. The idea is that the yogurt needs to cool slowly. Often it is lukewarm still when we open it in the morning.
Let sit over night, or all day if you made it in the morning. And put it in refridgerator containers. I have found not to flavor the yogurt until you are ready to eat it. The yogurt will last longer without anything in it. Often you will see liquid lying on top or just under the surface. Just stir it in, it is whey folks.
NOW - GREEK YOGURT
Ron and I discovered Greek Yogurt in Florida and went nuts over it. We brought 1/2 a dozen containers back and actually thought of having it shipped to us. That's when I decided I could probably learn to make it. It is sooooo simple, you are allowed to giggle, ok?
Take that yogurt you just made. You can use cheesecloth, or I use a thin cloth napkin, and line a collander with it. Put this collander on top of a bowl. Spoon in yogurt and let it sit for 3 - 4 hours. The whey will drain into the collander, the yogurt becomes thick - which equals, Greek Yogurt! Refrigerate and enjoy.
Two things now. DO NOT THROW AWAY THE WHEY! Place it in a refrigerator container, we will use it later this week, often.
And if you continue to let the Greek Yogurt drain, you will have "cream cheese". I like to add Mexican or Italian or Indian seasoning and use as a sandwich spread or cracker dip.
Let me know how yours turn out! And later this week we will work with the whey in breads and soups and make another simple cheese.
So today I will share with you how I make both yogurt and Greek Yogurt. And in the next week, I will add, cheese, bread and soup. Why? Because they are all related in their ingredients, taking from one another. I love Food Science, and hope you will enjoy it too!
We don't use Yogurt Makers here. The ones I have seen, we would have to use them 3 times a day to get the quantity of yogurt we eat. I use a large pan that easily holds a gallon of milk. This is very important. Because if you use less milk with this method, it cools too quickly and doesn't actually make yogurt. And the milk, you can use Whole or 2%. Less than that does not give you as much yogurt and it is too watery.
Put your stove setting on high, we want to ALMOST boil the milk. This process is very meditative for me, enjoy it. While the milk is heating to 175 to 180 degrees, stir absolutely constantly. Watch the change in the milk's consistancy and color. In a short period of time of making yogurt regularly, you will be able to see the milk change and practically tell when it is ready by sight. In my pan, which is coated metal, it takes 15 minutes to get the milk to 175 degrees.
Now turn your stove off and let set until it is between 110 and 120 degrees. Again, mine take about 50 minutes, in a metal coated pan. Now the 1st time you make yogurt you need to buy regular, NEVER FLAVORED, yogurt. The luncheon size, what is it 6 - 8 oz? The first time, I use a lot of starter to insure thick creamy yogurt. After the initial batch, I use about 1/4 of a cup or if you want to use "freeze dried starter" from the health food store, 4 packets. (The starter in packets is really nice to have around for emergercy. You know, like you ate all the yogurt and forgot to keep some for starter.) Put the entire contents in the warm milk and stir well. Put your lid on and move the yogurt to a place where you will not disturb it. You will be putting the yogurt "to bed" now. We use a flannel sheet and cover the entire pan, with lid on. A wool blanket or winter coat will also work. The idea is that the yogurt needs to cool slowly. Often it is lukewarm still when we open it in the morning.
Let sit over night, or all day if you made it in the morning. And put it in refridgerator containers. I have found not to flavor the yogurt until you are ready to eat it. The yogurt will last longer without anything in it. Often you will see liquid lying on top or just under the surface. Just stir it in, it is whey folks.
NOW - GREEK YOGURT
Ron and I discovered Greek Yogurt in Florida and went nuts over it. We brought 1/2 a dozen containers back and actually thought of having it shipped to us. That's when I decided I could probably learn to make it. It is sooooo simple, you are allowed to giggle, ok?
Take that yogurt you just made. You can use cheesecloth, or I use a thin cloth napkin, and line a collander with it. Put this collander on top of a bowl. Spoon in yogurt and let it sit for 3 - 4 hours. The whey will drain into the collander, the yogurt becomes thick - which equals, Greek Yogurt! Refrigerate and enjoy.
Two things now. DO NOT THROW AWAY THE WHEY! Place it in a refrigerator container, we will use it later this week, often.
And if you continue to let the Greek Yogurt drain, you will have "cream cheese". I like to add Mexican or Italian or Indian seasoning and use as a sandwich spread or cracker dip.
Let me know how yours turn out! And later this week we will work with the whey in breads and soups and make another simple cheese.

5 comments:
I found you through Little Pink Houses and I like your blog.
You make the yoghurt making sound very simple, so much so that I have bookmarked this page and will be getting around to having ago at this.
I eat loads of yoghurt and Greek is the best.I will let you know how I get on and thank you for sharing.
Lia
Awesome--thank you so much for this! I'm really excited to give it a try, though I think that I'll need to buy a new thermometer first. Still, quite exciting, because we can go through a *lot* of yoghurt.
Your yogurt always smells delicious, even unflavored, when I feed the pups. :)
Okay, so, I'm going to give this a go this weekend. That said, do I need to have a specific kind of milk? Like, not ultra-pasteurized? Or is the sort from the supermarket adequate?
I started making yogurt earlier this year and didn't like the taste. It seemed to have a strange aftertaste as opposed to Fage which I used as a starter. I'm going to use your directions and try again.
Post a Comment